Stockyard Beginners Guide - Creating a Sale
Creating and processing a sale in Stockyard is a step-by-step workflow that ensures all sale details — from vendor NVDs and lot creation to purchaser ways and RFID validation — are accurate and complete before reports or settlement are finalised. This guide walks you through every major step of the sale lifecycle, starting from adding a new sale record and linking the correct Sale Type, to managing NVDs, building and validating Lots, reviewing all vendor and purchaser information, and finally running reports or processing the sale for billing and accounting. Whether you’re operating from the Saleyard, Office, or managing a Bidder/Stud sale, this Knowledge Base provides the essential checks, references, and best-practice notes to help you complete each sale smoothly and confidently.
At a glance
- Livestock → Sale Control → Add
- Pick Sale Type, set Description, Date, Due Days → Save
- In the sale, Add NVD(s) for each vendor
- Create Lots in Office/Presale (and weigh/scan if needed)
- Check Vendor Listing, Purchaser Ways, RFID tabs
- Reports → Process when complete
Before you start
- ✅ You have a Sale Type that matches the sale you’re creating.
See: How to Create a Sale Type (link) - Your Sale is set up for RFID / Weighing / Presale if you intend to use those features.
See: Refer to how to create a Sale Type - You know who this sale is for (e.g., Prime sale vs Bidder/Stud sale).
Step 1 — Create the sale
- From the Main Menu, open Livestock.
- Click Sale Control. You’ll see the Sale Grid (all existing sales).
- Click Add
- In Sale Type, choose the correct type.
If it’s missing, see: How to Create a Sale Type (link). - Description auto‑fills from the Sale Type; change it if you need a friendlier report name.
- Set the Sale Date (the event/market day).
- Comment is private—handy for notes like lead agent, expected head, or internal instructions.
- Due Days
- Payment Due Days → when purchaser invoices are due.
- Settlement Days → when vendor account sales are settled (paid out).
(Adjust to your office policy.)
- NVD Custom Fields - Knowledge Base on Understanding the NVD Custom Fields
- Click Save.
Step 2 — Understand the sale screen
After saving, you’re inside the sale. Learn the layout once; it’s the same every time.
Top action buttons
- Select — return to the sale list
- Office — create/edit lots (primary data entry screen)
- NVD — create/edit vendor NVDs; manage ERP/MBM transfer
- Process — open/close for update; run bulk billing/accounting and create journals
- Report — run sale reports
- Weigh — weighing screen (if enabled)
- Presale — quick lots without buyer details (if enabled)
- Bidders - Used in Bidder Sales only - Allows you to enter the Bidders to be used in the Sale
- Close — exit the sale module
Tabs inside a sale
Underneath the buttons, you will have the Sale Type / Name to be seen and the date of Sale. If you are a Saleyard, you can see the Agent and Run dropdowns to filter the list by Agent/Run.
| Tab | What it shows / why it matters |
|---|---|
| Lots | All/filtered lots in the sale. Use Search For to find lots; filter by agent in saleyard mode. |
| Vendor Listing | All vendors used; see head variations & values. Right‑click a vendor for commission, transit insurance, reports, or Vendor Control. |
| Bidders (Bidder sales only) | Bidders (purchasers) for stud/bidder sales to manage payments and list of bidders. |
| Agents (Bidder sales only) | Agent list with rebate% and bidder counts. |
| Payments (Bidder sales only) | All bidder payments to be banked later (after Sale is complete). |
| Purchaser Ways | Purchasers, assigned accounts, head counts, and PIC destinations. You can change a purchaser’s PIC Location here for all lots. |
| RFID Summary (RFID sales) | NLIS/RFID totals, variances, and transfer status. |
| Display RFIDs (RFID sales) | Every RFID across all/filtered lots; right‑click for NLIS actions. |
NVD Summary (5.10 release) | Lists the summary of number of NVDs - including ERP checks, and eNVD integration, MBM Summary (NLIS overview) |
| Extra Charges | One‑off charges (e.g., dipping/feeding/retag). Must be set up in Maintenance → Extra Charges first. |
| Lot Validation | Incomplete lots, NVD head mismatches, RFID variances. |
| Special Features | NLIS transmissions, vendor/purchaser changes, edit auto‑charges (inherited from the Sale Type). |
Lot Totals Overview
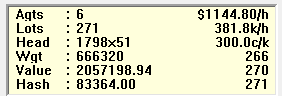
To give you an understanding, it means “Lots in View” (or yellow box in Sales)
Shows a live summary for the current lot filter:
- Agts — distinct agents in the view
- Lots — lot count
- Head — total head across those lots
- Wgt — total weight
- Value — sum of lot values
- Hash — raw sum of price fields (a quick sanity check; not head‑weighted)
 Tip: You can filter the way lots are displayed by choosing Lot, Breed, Purchaser Code/Name, or Vendor Code/Name
Step 3 — Add NVD(s) (required before saving a lot)
- Click NVD.
- (Saleyard only) Choose Agent (filters your list and vendor numbering).
- Click Add to create a new NVD record.
- Find the vendor by Code or use Search PIC. If still not found, click Vendor to open Address Book and add/confirm detail
- Vendor# lets you tag a vendor’s running number for the sale day. It auto‑increments from the last used number.
- Enter the required NVD form details (from the paper/electronic NVD).
- Save - Once you Save, you will be able to enter another NVD quick and easy
- Click the Close button when you are finished with the NVDs.
Adding of NVD Images to attach to these NVDs, follow this Knowledge Base on How to Attach NVD Images to a NVD
Step 4 — Create lots (Office / Presale)
Back on the sale screen:
- (Saleyard) Set Agent and Runs (if used). This also filters which lots you see in Lots.
- Use Office (main method) or Presale (quick lots without buyer details) to add lots.
Office — field guide
The fields mentioned below can be changed in to any order and set as Mandatory or not, allows you the flexibility to only show what you want to see.
Fields can be re‑ordered/hidden or made mandatory via Sale Type settings.
Fields can be re‑ordered/hidden or made mandatory via Sale Type settings.
| What it means | |
|---|---|
| Agent | The selling agent for this lot. |
| Pen | The yard/pen ID where the livestock sits. |
| Marks | Brands/marks to help yard staff locate/verify. |
| Head | Count of animals in this lot. |
| Progeny | Offspring sold with the head (included for weighing/price calcs as per your setup). |
| Stock Type | Category (e.g., Bulls, Cows & Calves, Steers, Weaners). |
| Breed | Breed (e.g., Angus, Hereford). |
| Dentition | Teeth class—often used for age and pricing. |
| Vendor# | Number from the NVD screen; useful in saleyard workflows. |
| Vendor | The seller; select the NVD you added in Step 3. |
| GST | Vendor GST status. |
| Weight | From Weigh screen or entered manually (depends on unit). |
| Price | Sale price. Combine with Per to set per‑head, per‑kg, or per‑lot pricing. |
| Per | H = head, K = kg, L = lot. |
| Total | Calculated value (based on Price/Per and Weight/Head). |
| Purchaser | Buyer for this lot (add later via office or presale if unknown at creation time). |
| Way | Transport/waybill destination details; PIC can flow from Purchaser Ways. |
- Weigh from the Weigh screen using Lot Recognition (fast lane) or weigh while editing in Office.
- RFID scan with a panel reader or wand (if connected); can scan in Office or Weigh.
Step 5 — Review lots, vendors, purchasers, and RFIDs
Once lots exist and have set a Price/Buyer/Weigh, now to review the rest of the Sale:
- Tabs to review (non-bidder sales)
- Vendor Listing — confirm each vendor’s lots, head, and values; right‑click to check 'Vendor Control' for commission
- Purchaser Ways — confirm purchaser details, accounts (way), head totals, and PIC destinations; you can set a purchaser’s PIC Location here to apply to all their lots.
- RFID Summary / Display RFIDs — validate NLIS counts, variances, and transfer statuses; right‑click Display RFIDs for NLIS actions.
- Extra Charges — add one‑time charges (dipping, feeding, tag replacement, etc.).
Requires maintenance setup in Maintenance → Extra Charges. - Lot Validation — fix incomplete lots, NVD head mismatches, and RFID variances before reports/processing.
- Tabs to review (for bidder sales)
- Same tabs as non-bidder sales (refer to above)
- New tabs are, Bidders, Agents and Payments
- Bidders - This is where all your bidders will be and what they owe you (if assigned to lots)
- You can process the bidders payments here
- Agents - Lists the agents assigned to the bidders (from the bidder edit screen) - Here you can assign the rebate %
- Payments - This shows the list of the payments made by the bidders (they show up here - ready to be banked when done)
- If a Bidder will pay you later, you will leave the bidder owing money in the Bidder tab.
Step 6 — Reports & Processing
In the Sale Buttons explanations:
- Report — run your presale/sale/day‑end reports. Save or print as needed.
- Very detailed Overview of the Reports view in Livestock - CLICK HERE
- Understanding Scheduled Reports - Sending bulk emails to clients - CLICK HERE
- If you have used LE (SaleyardLE, SaleyardPlus, AgentNLIS) - Please refer to this guide for the Report Names compared with our LE product - CLICK HERE
- Process — when ready, use Process to open/close the sale
- for finalising a sale, preventing further changes.
- for accounting processes:
- Bulk billing/accounting actions
- Create journals for purchaser invoices and vendor settlements in the Accounting module
Role‑specific notes
- Bidder/Stud sales add these tabs: Bidders, Agents, Payments.
- Saleyard vs Office screens are mostly the same; saleyard workflows emphasise Agent/Runs, Weigh, and RFID.
Troubleshooting & FAQs
- I can’t see the Sale Type in the Add screen I want to use?
- Check that you have added the Sale Type - Please refer to How to Create a Sale Type
- Payment Due vs Settlement Days - what’s the difference?
- Payment Due Days: when purchaser invoices are due.
- Settlement Days: when vendor account sale pay-outs are due.
- Vendor not found while adding NVD?
- Does the vendor exist? If so, use the Search PIC and see if they appear in there, you can clone a Vendor from another Agent from here.
- Use Vendor to open Address Book and create/update the record.
- Yellow tile totals don’t match what I expect?
- Check your current filter/search in Lots (the tile only sums what’s in view).
- Confirm Per (H/K/L) and Weight entries
- RFID mismatches / NLIS variances?
- Use Lot Validation for a quick list.
- Open Display RFIDs and right‑click to run NLIS actions or fix tags.
- I am missing an Extra Charge option, where do I set up Extra Charges?
- Maintenance → Extra Charges (then return to the sale’s Extra Charges tab).
Related guides (link these)
- How to Create a Sale Type
- How to Split a Lot
- Setting up Extra Charges
- Weighing & Lot Recognition
- NLIS/RFID configuration & workflows

Want to know what the Best Practice is for a Saleyard ? - Refer to this Knowledge Base
Related Articles
General Overview to Stockyard for a Saleyard
Getting Started with Stockyard Stockyard is a powerful saleyard management system that simplifies livestock sales, vendor and purchaser record-keeping, NLIS compliance, weighbridge and scanner integration, and reporting. 1. Launching Stockyard To ...Clearing Sale Overview
The Stockyard Clearing Sale module allows agents to sell items other than livestock in a more basic format. It was created for use out of the office and in an environment where invoices could be printed, payments taken, money banked and sale ...Bidder (Stud) Sale Process
Introduction Creating a Bidder Sale in Stockyard is very similar to running a normal sale (Refer to how to create a sale). The main differences are that a bidder sale introduces: A Bidders button (to register and manage bidders) A Bidders tab (to ...Sale Document Comments
Adding Comments to Sale Documents If you have the generic bank details and mail information showing on your invoice, this comment will be above the details. In the Livestock Module of Stockyard: Step 1: Open the Sale Type Click on Maintenance > Sale ...Stockyard Sale Process - Best Practice
This article assumes your site has access to the Stockyard and Stockyard Mobile technologies. For more information about getting access to Stockyard, send us an email to sales@outcrosssystems.com.au or call us on 1800 799 107 This article will ...