General Overview to Stockyard for a Saleyard
Getting Started with Stockyard
Stockyard is a powerful saleyard management system that simplifies livestock sales, vendor and purchaser record-keeping, NLIS compliance, weighbridge and scanner integration, and reporting.
1. Launching Stockyard
To begin:
- Open the Stockyard program on your PC.
If it's not installed, please contact Outcross Systems Support for assistance with installation.
- At the sign-in screen:
- Select the Company you wish to log in to.
- Enter your password to access the system.
- Click Login to Get Started !
2. Overview of the Tabs on all sub-programs
Each subprogram in Stockyard includes a toolbar at the top for navigation. Below are key menus commonly used:

- System (Commonly used in all subprograms)
Used for key system settings like:- NLIS configuration (via Livestock)
- Enabling/disabling inactive records (via Accounting, Clearing Sale, Address Book, Livestock)
- Proxy settings (configuring your system)
- Checking for Updates to Stockyard (via Main Menu)
- Performing backups (via Main Menu on the server)
- Reports (Commonly used in Accounting, Address Book, Clearing Sales, Livestock)
- Access high-level reports relevant to each subprogram.
- Maintenance (Commonly used in Accounting, Clearing Sales, Livestock)
Manage global settings such as: - Proxy settings
- Sale types
- Charges (and Extra Charges)
- Stock types
- and many more...
- Actions (Commonly only used in Accounting)
Provides quick access to key areas of the subprogram
- Address Book (Available in All Screens)
A shortcut for managing contact details.
3. Main Subprograms Overview
Here’s a breakdown of the key subprograms you’ll use in a saleyard environment:
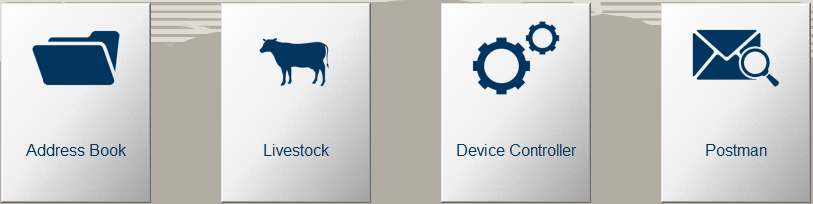
Address Book
Manage all contact records, including:
- Agents
- Vendors
- Purchasers
- Contractors
- Employees
- 3rd Parties
Livestock
Core area for managing:
Core area for managing:
- Sales (Creating of New or Editing existing Sales)
- Adding of Charges to Agents, Vendors, Purchasers
- Breeds, stock types, and sale types and much more...
Device Controller
Configure and manage connected devices such as:
- Weighbridges
- RFID Scanners
- NLIS Interface
Postman
View, manage, and send system-generated reports.
View, manage, and send system-generated reports.

Below is a breakdown of all the main subprograms for a Saleyard.
Understanding Address Book
The Address Book is where you create and manage contacts, including:
- Agents – Sell livestock on behalf of vendors.
- Purchasers – Buy livestock at the sale.
- Vendors – Sellers of livestock.
- Contractors – Transport and other third-party service providers.
- Employees – Staff with login access to Stockyard.
Creating or Editing a Contact
- Click "Add" (to create a contact) or Search and Double-Click a Contact (to edit an existing one).
- Choose the Legal Entity (Company, Individual, Partnership, or Trading Name).
- Enter a Name (Commonly used Individual / Trading Name for Contacts)
- Enter GST & ABN Details (if applicable).
- Enter Primary Contact Details:
- Phone & Email (Email is important for automated reports).
- Address (Line 1, Town, State, Postcode) – The destination address.
- PIC (Property Identification Code) – Main PIC used for default Account/Way (Required for NLIS).
Vendor & Purchaser Options
Configure the contact’s role:
- Select one role only: Only one role can be selected per contact
- Vendor (Ticking will enable this contact as a Vendor)
- Assign an Agent (if Vendor is selected):
- Use the dropdown list to link the vendor to their Agent.
Note: Each Agent will have their own Vendor contacts - Purchaser (Ticking will enable this contact as a Purchaser)
Additional Contact Details (once a contact is saved - further details in the contact appear on the right)
Addresses

- Add multiple addresses beyond the primary one.
- Addresses can be categorized based on their purpose (e.g., mailing, delivery, property location).
- Vendors and purchasers can have multiple PIC-linked addresses for accurate livestock movement tracking.
Phone & Internet

- Store multiple phone numbers and emails with descriptive labels (e.g., Telephone, Emai).
- Important for keeping track of contact information and references.
- Useful in selecting the emails for Scheduled Reports.
Agent Details

- Agent Code – Unique identifier assigned to the agent.
- Selling & Weighing Permissions – Defines the agent’s ability to conduct sales and weigh livestock.
- Sale Disk Options – Export sale data in formats such as Belvoir XML, LE XML.
- Dentition Type – Classification for age-based livestock grading.
- Scheduled Agent Reports – Assign reports to be sent automatically, such as:
- Agent Purchaser Summary
- NVD Image (Agent Copy)
- Sale Disk (XML formats)
- Vendor Information Report
Purchaser Information

- Scheduled Purchaser Reports:
- Purchaser Information Report
- NVD Image (Purchaser Copy)
- Purchaser Summary
- Purchaser Accounts & Linked PICs:
- Assign multiple accounts to a purchaser.
- Link specific Property Identification Codes (PICs) to ensure correct livestock movements.
Vendor Details
- Agent Assignment – Define the vendor’s associated agent.
- Vendor Brand – Store branding details for livestock identification.
- Scheduled Vendor Reports:
- Vendor Information Report
- RFID Vendor List
Registrations
- Track compliance programs required for sales and livestock movements, including:
- LPA (Livestock Production Assurance)
- EU Accreditation
- MSA (Meat Standards Australia)
- BJD (Bovine Johne's Disease) Status
- Cattlecare Certification
3rd Party Control
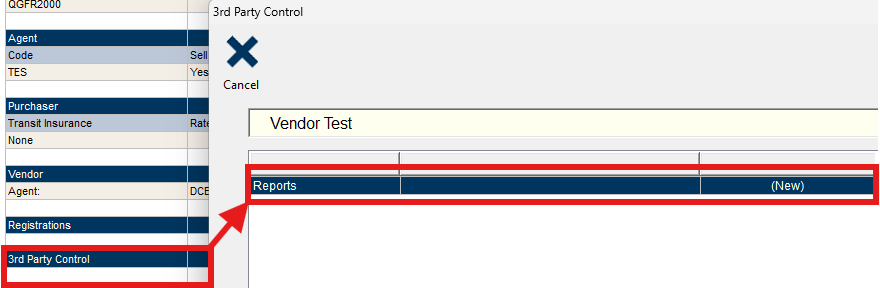
- Assign third-party scheduled reports to be sent automatically, such as:
- Council Report
- Statistics by Stock Type
- Other compliance and custom reports
Employee Details
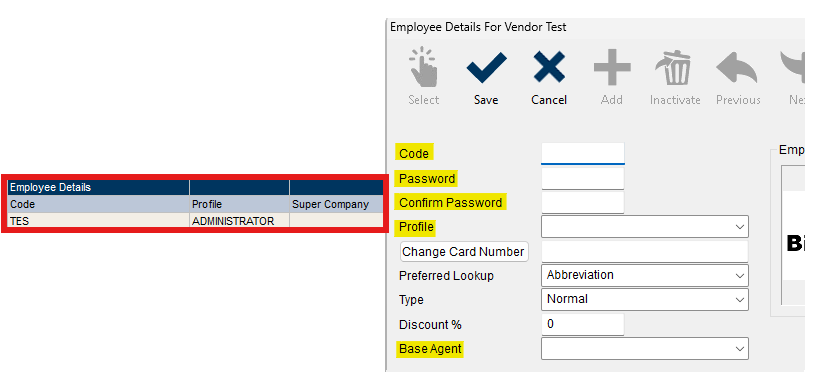
- Employee Code – Unique identifier for login access.
- Stockyard Login Password – Required for system authentication.
- Profile & Access Level – Defines permissions within the system (Administrator, Agent, Manager, Yard Staff).
- Base Agent – Restricts employee access to a specific agent or all agents.
Client Diary
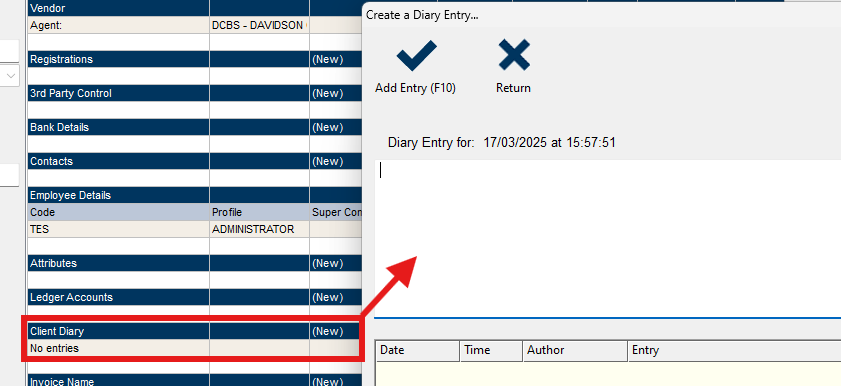
- Record interaction history with contacts.
- Useful for tracking correspondence, agreements, transactions, and notes.
Understanding Livestock
What is this?
In Livestock, this is where you manage your sales, including breeds, stock types, and sale types used for all sales.
The Maintenance screen contains settings that apply to all sales. Think of Maintenance as global settings or template options that define how a sale works.
- Breed – A list of all breeds categorized by sale type species (can be edited or added).
- Charge – Auto charges that apply automatically to every new sale or when updating an existing sale.
- Extra Charges - One-off charges to apply to the Sale, e.g. Retagging, Dipping, Kill Fee, Feed...
- Marks – A list of valid marks that the saleyard applies to livestock. You can create new ones or right-click to deactivate ones that are no longer used.
- Sale Types – Manage how sales operate, including:
- Changing the field order in Office/Presale screens.
- Setting up NLIS Actions that apply to that sale type.
- Adding charges to the sale type to be used in sales.
- Setting up statistics ranges for the "Statistics by Stock Type" report (also called the Market Report in LE).
- NVD Custom Fields – If you need extra NVD fields that repeat in sales, like "Grass Fed" or "Antibiotic Free", you can add them here.
- Runs – Add or edit sale runs (e.g., Run 1, Run 2, etc.).
- Sale Comments – Add comments that show up on vendor and purchaser reports.
Further Information on how to create, edit, and get a feel of a Sale, check out this link: Stockyard Beginners GuideHow to View the List of Sales
Once you click on Livestock, click the button "Sale Control" to list all sales.

You can customize the buttons to make it easier to access commonly used features.
For example, if you always need to access Charges, Extra Charges, Breeds, or Stock Types, you can add them as quick buttons so you don’t have to go through the Maintenance dropdown every time.
Example buttons below:
Understanding Reports & Emailing
Running Reports

Note: It's important to get a feel of the reports when you have lots and data - ensure to run a few to get the hang of what is what to help you
- Select the report
- Some reports will ask you to select an Agent / Purchaser / Vendor / Contractor or none at all (to run the report)
- Choose Print Queue (default: Screen)
- Can Email using Email Queue (Type or Select Email) or Transmit (to Default Email address of the contact)
- Click Generate
Sending Custom Selected Reports to Agents, Purchasers & Vendors
- Scroll down to find Scheduled Reports
- Choose Scheduled Agent, Purchaser, Vendor, or 3rd Party Reports
- Select recipients:
- You can individually select the contacts or
- Multi-select specific contacts (tick box on right) or
- Send to all (by not selecting any person)
- You can individually select the contacts or
- Choose Normal (send immediately) or Confirm (review before sending)
- Click Generate.
⚠️ Ensure scheduled reports are configured in the Address Book
Understanding Device Controller
The Device Controller manages interfaces such as:
- Weighbridge connections.
- RFID scanners.
- Other connected devices.
Features:
- View device logs.
- Restart/shutdown connected devices.
- Configure device settings.
Understanding Postman
Postman is the internal messaging system for reports.
- All generated reports are stored here.
- You can review, resend, or troubleshoot emails.
- Blue-highlighted reports indicate email sending issues.
Related Articles
Downloading and Configuring Stockyard Mobile Connectivity
Downloading & Updating Stockyard Mobile If you don't have Stockyard Mobile installed yet, follow these steps to get started: For Android Devices (Samsung, Google Pixel, etc.): Open the Play Store (sign into your Google account if prompted). Search ...Overview of Livestock Reports
Stages in Livestock Reporting Overview of Livestock Reports Generating and Previewing Reports Understanding Scheduled Reports (Bulk Email) Introduction This guide equips you with the knowledge to navigate Stockyard's livestock reporting system ...Clearing Sale Overview
The Stockyard Clearing Sale module allows agents to sell items other than livestock in a more basic format. It was created for use out of the office and in an environment where invoices could be printed, payments taken, money banked and sale ...Saleyard Statistics Report
For the selected date range and species, the following sections are contained in the report: Throughput by Stocktype Value by Stocktype Statistics by Stocktype broken up by per head Statistics by Stocktype broken up by per Kg YTD Statistics by ...Stockyard Hardware Specifications
This guide outlines the hardware and network requirements for running Stockyard and Stockyard Mobile effectively across various environments including servers, workstations, and mobile devices. Server Requirements For saleyards with multiple users ...