Clearing Sale Overview
The Stockyard Clearing Sale module allows agents to sell items other than livestock in a more basic format. It was created for use out of the office and in an environment where invoices could be printed, payments taken, money banked and sale completed all on the same day.
For those using the Stockyard Account module, all the required journals are then generated depending on when you process your sale. If all payments are recorded in the clearing sale then only the journals required for the bank reconciliation are created. If some payments are not taken on the day then these amounts can be added to the client's ledger when the sale is processed.
Clearing Sale Home Screen
The home screen buttons can be modified but generally show the shortcuts to viewing or maintaining a sale. New Charges, Extra Charges, Lot Types must be created before being added to a sale.
Sale Control is where new sales are created or older sales viewed.
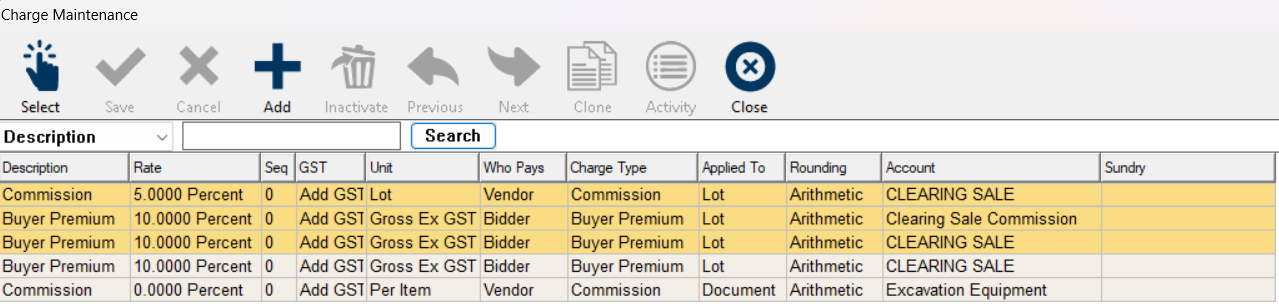
Charges
These are applied to all similar types of contacts in the sale i.e. if it is a vendor charge, all vendors will be charged.
Once these have been created and used in a processed sale, they appear yellow in the list and cannot be modified.
Click on '+' to create a new charge.
Extra Charges
These are unique charges that must be individually applied to each contact type in the sale, if required eg advertising.
Click on '+' to create a new extra charge.
Lot Types
These can be created to be as generic or specific as needed.
Click on an empty line to create a new lot type.
For more information see Lot Types.
Sale Control
Allows the creation of a sale and is also where you can access previous sales.
Creating a sale
Click on the '+' in Sale Control to create a new sale and complete the required details for the sale in the Sale Maintenance window.
Unlike Livestock, there is no template to create a sale from each time. As clearing sales are typically all very different in content, each new sale needs to have the lot types and charges added as required.
Sale Maintenance
Includes all of the below information to be entered when first created. If you find any of the information you have entered needs to be updated, click on the button to the left of the sale name called "Sale" and it will take you back to this screen.
Location and Description appear on the invoice and account sales so try to make this unique to each sale.
Add the Sales Charges you are aware of before the sale starts eg commission and buyer's premium by right clicking on the charge.
Charges already used in a previous sale cannot be edited. They appear yellow in the list.
If you need to change the charge, clone it and update the details before attaching.
Lot Types will also need to be added so they are available when entering the details for the lots.
Overview of Clearing Sale
The summary screen displays icons and tabs to show information available for the sale.
Office, Pre- and Post-Sale icons can be used to add lot detail .
- The Pre Sale button allows the lot and vendor details to be added before the sale.
- Once you have the price and buyer's detail these can be added using Post Sale.
- The Office icon allows you to add all the detail or at the same time or edit the fields.
New vendors and buyers can be added whilst entering lots by clicking on the respective buttons.
If a bidder has already been added use their Bidder number to attach their details.

When adding contacts, ensure that you are using any contact you already have in the system, especially if you are using the accounting module.
A new contact record and ledger will be added for anyone who hasn't been attached to an Address Book record so you could end up with duplicate ledgers and contact records.
The Process button allows you to close the sale and create the required journals if using the Accounting module.
If changes are needed to be made once a sale has been closed, the same button displaces as Update Sale to reopen the sale then Re-process to close it again.
A list of reports can be accessed from the reports icon or printed when right clicking in the various tabs.
Lots
The first tab of the summary screen lists lots and their basic detail. Double click to open one up.
Use the Bidder number find the details and tab to enter them into the lot.
Vendors
The list of vendors appears in this tab. Right clicking on a vendor allows you to:
Adjust commission or
Update details in Address Book
Create a new lot
Print the account sale.
Bidders
The Bidders tab has two functions. It has the summary details of all bidders and is also where the payment process is performed.
Right-clicking on a bidder gives you various other functions connected to maintaining the bidder.
Create a Bidder record
It is important to use any current details in Address Book when adding Bidders otherwise duplicate ledgers and records could be created.
- For someone who already exists, click Add and type the first few letters of their name and use F6 to search in Address Book for their details.
- For someone who does not exist in the Address Book, after clicking Add, enter the rest of their details. If they buy something in the sale you and you want to retain their details you can right-click to add them to the Address Book.
- Clicking on the AB Name button allows you to search and/or add details in Address Book.
- Agents for the bidders can also be added in this screen too.
Taking Payments
To collect a payment, click on the relevant bidder and the payment screen will generate.
Bidders marked in orange have payments to make and ones in green have paid.
Full or part payments can be made. Use Specify for amounts that are not fully paid, or tick the box for an amount that directly corresponds with a lot total.
Ensure you record the type of payment correctly as this will effect the banking report and later any journals that need to be reconciled.
Once the payment has been recorded an invoice will immediately pop up to be printed or emailed.
If a part-payment has been made the outstanding amount will be displayed and transferred to the ledger when the sale is processed.
Payments
This tab gives you a summary of the payments outstanding or completed. This is also where you complete the banking to process the sale and close it.
 Before processing the sale, ensure that you have used any existing Address Book client details as a new/duplicate ledger account and contact record will be created when the sale is processed.
Unbanked amounts show in beige:
Bidders payments in purple have been banked.
If a mistake is made in receipting a payment (before processing the sale), right-click on the bidder in the Bidder tab to refund the amount.

In order to process the sale, everything taken must be banked. Any unpaid items will have a journal entry in the ledger for that client.
Extra Charges
If there are any individualised charges that need to be added to specific contacts, this needs to be done before payment is taken, or the sale processed.
Extra charges display as GST Inclusive but can be set up as Add GST or GST Exempt, depending on how you are calculating your charge.
Note that once the Extra Charge is saved, it will display as Including GST with the calculated amounts broken down.
Special Features
This tab allows you to create multiple templates for Bulk Bidders details - useful for quickly adding any new contact for the sale.
See above for other ways to add bidder details.
Once the sale has been processed it is also possible to see all the journals created from the sale here.
Processing the Sale
1. Check contact details
It is important to check that existing contact details have been correctly added to the Bidder record before you process and close the sale, duplicate ledgers and contact might otherwise be created.
- To check an existing contact, click on the AB Name button in the Bidder tab. You should be taken through to their details in Address Book.
- If you only get to the search page in address book they do not exist in Address Book. They should be a new contact not yet added.
- It is possible to add them after the sale if you would like to by right clicking on them in the bidder tab to Add Bidder to Address Book.
2. Check charges and extra charges are correct
Ensure these have been added where required by previewing account sales and invoices.
3. Payments
Confirm that all payments taken are recorded and bank them. It is not possible to close a sale without banking payments.
4. Process the sale
This will transfer the payments received to the Bank Reconciliation window in preparation of reconciling with the bank statement. Cash is entered as a lump sum. Refer to the Banking Deposit Report if need be.
Unpaid items will be put on account and transferred to the relevant ledgers in Accounting to await receipting.
Updating details in the sale
It is possible to update and change details in a sale. Journals will be reversed and new ones created if you are using Accounting. The Process button changes to Update once a sale has been processed.
Related Articles
General Overview to Stockyard for a Saleyard
Getting Started with Stockyard Stockyard is a powerful saleyard management system that simplifies livestock sales, vendor and purchaser record-keeping, NLIS compliance, weighbridge and scanner integration, and reporting. 1. Launching Stockyard To ...Payment Errors in Clearing Sales
If a payment has been made against the wrong bidder: Go to the Bidder tab: Open the bidder record. Fully pay the lot by ticking the box and clicking on Pay (F10). Take note of the payment type. Confirm the Payment in both following screens. ...Stockyard Beginners Guide - Creating a Sale
Creating and processing a sale in Stockyard is a step-by-step workflow that ensures all sale details — from vendor NVDs and lot creation to purchaser ways and RFID validation — are accurate and complete before reports or settlement are finalised. ...Bidder (Stud) Sale Process
Introduction Creating a Bidder Sale in Stockyard is very similar to running a normal sale (Refer to how to create a sale). The main differences are that a bidder sale introduces: A Bidders button (to register and manage bidders) A Bidders tab (to ...Sale Document Comments
Adding Comments to Sale Documents If you have the generic bank details and mail information showing on your invoice, this comment will be above the details. In the Livestock Module of Stockyard: Step 1: Open the Sale Type Click on Maintenance > Sale ...