Changing an Animal's Visual ID within Live Entry
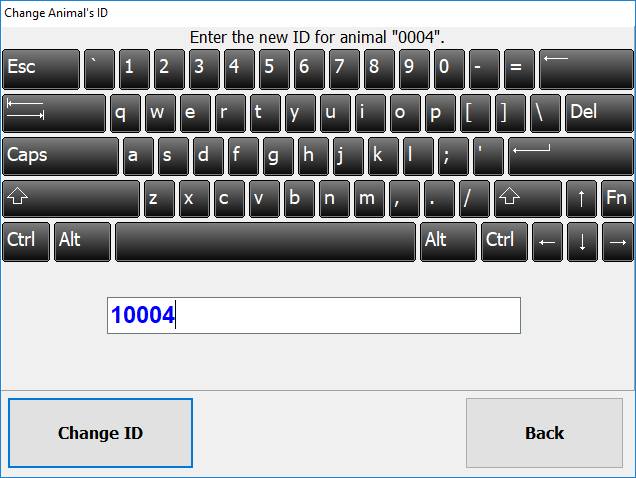
It is possible to change an animal's visual ID within Live Entry.
To change the Visual ID
Select the "C" button at the top right of the ID window.
The on-screen keyboard and an edit box will appear
Enter the new ID.
Select
Note:
if you have a keyboard attached to the device, you don't need to use the on-screen keyboard.
Once you have changed the ID and are done, press the "Change ID" button to change the animal's ID.
If you decide NOT to change the ID, simply press the "Back" button.

Related Articles
Change ear tag of animal in SB Live
How do I change the ear tag (Primary Id. or visual Id.) of an animal in Live Entry? In the Live Entry (Stockbook Live!) window: Step 1. Make sure you have selected the animal you wish to edit. Step 2. Click on the Stockbook Edit button at the bottom ...Live Entry - Early Entry of Next VID
Live Entry can be made faster by entering the next Visual Identification. Step 1. In Live Entry - click on the Setup > Session Defaults menu option Step 2. Tick the Allow early entry of next visual ID. box Click on the OK button Step 3. Select the ...Setting session defaults in Stockbook live entry.
It will pay to have a look through the Session Defaults within Stockbook Live Entry to see what features are possible. These instructions guide you through setting up Session Defaults in Stockbook Live Entry. Session Defaults allow you to set certain ...Importing Tag Bucket Files (Unallocated Tags)
When you purchase your NLIS tags you can request the supplier provide a file containing NLIS IDs and corresponding EIDs. This list can also be obtained directly from the NLIS database and then imported directly into Stockbook Follow this link for ...Mothering up in Live Entry
How to use Stockbook Live Entry for Mothering Up Note: For the 'Mothering Up' function to appear, the lambs/calves cannot already exist in Stockbook If using Electronic tags, they can exist in the Unallocated Tag List. 1. Open Live Entry Click on the ...