Adding DNA Samples into Stockbook
There are multiple ways of getting DNA samples into Stockbook.
- Using a barcode scanner via Live Entry
- Manually entered via Live Entry
- Master CSV import
A. Using a Barcode Scanner to Collect the Samples into Live Entry.
- Connect the barcode scanner. For assistance with connecting a barcode scanner for the first time contact Outcross Systems support team.
- Open Live Entry
- Choose the template you will be using on the day.
- Click Start Live Entry
To collect DNA data against each animal, follow these steps to edit your data entry template
- Select Setup
- Select Data Entry Template
- From the Available Options locate DNA
- Click the " + " to expand the sub-options
- Double click or select and click the arrow, to add the fields, Sample ID and Sample Type to Selected Options.
- Click OK

- The template will now show the fields you added.
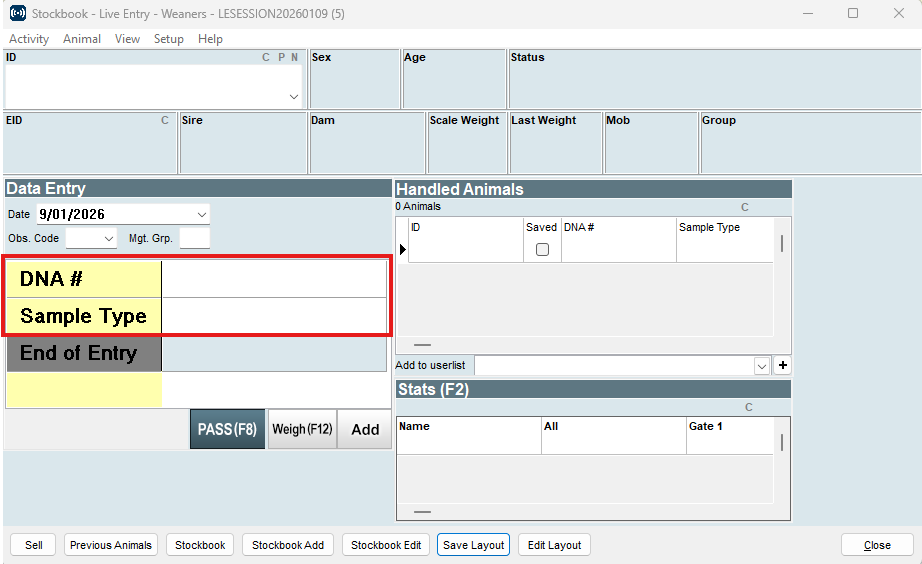
- Click Save Layout to save any changes made.
Now bring the first animal through
- Scan the DNA # using the QR code on the end of the TSU or Hair Card
- Choose the Sample Type
- Scan the DNA # using the QR code on the end of the TSU or Hair Card
- Choose the Sample Type
Note:
The Sample Type will be remembered by Live Entry once the first animal is saved.
- Fill in all other relevant data for the session
- Click Save (F5)
The Date of collection, Sample ID and Sample type will now be in the DNA table for each animal recorded.
B. Manually typing the samples into Live Entry.
- Locate the Animal in Stockbook
- Click on the DNA window link
The DNA window will open.
- Click Add
- Enter the Sample Id
- Enter the Date of collection
- Enter the sample Type
- Click OK
The DNA sample will now be recorded against the selected animal.
- Click Close to exit
C. Master CSV import of DNA samples
This option is in reference to when you purchase animals with DNA samples, or the DNA samples were linked to the animals EID/RFID as a pack from a supplier.
- Open the file with the animal DNA samples.
- The File at a minimum should have a link to the animals VID or EID. Please note, If the sample is linked to the animal's EID/RFID, the sample number should be the EID/RFID without the space.
- The columns should contain, the animal ID, Sample ID and Sample Type.
Once you have confirmed the data is in the correct format save the file as a CSV and close the file.
- Open Stockbook
- Take a backup of Stockbook
Import the master CSV
- Select File > Import Options > Details from Data File
- Locate the file in Step 1
- Enter the Observation (Obs) Date in Step 3. It is recommended using the date the samples were collected as the Obs. Date.
- Assign the Data Types and Stockbook Fields as per the image below
- Click OK
- Follow the prompts, if you get errors open the error file and investigate. If the errors don't make sense, please call Outcross Systems Support team.
- Close the import window
For more information on importing a CSV file to Stockbook follow this link: Importing a CSV File
To check DNA samples have been assigned to the animals.
- Select one of the animals
- Click the DNA window link
A new window will appear and you should be able to observe the collected DNA data including
- Date of collection
- Sample ID
- Sample Type
Related Articles
Adding DNA Samples into Stockbook
There are a number of options for entering DNA samples into Stockbook. Using a barcode scanner, Manually typing samples into Live entry, or A master CSV import Using a barcode scanner Ensure the barcode scanner is connected to the computer Open Live ...Stockbook® DNA table
Stockbook® DNA tab Each animal in Stockbook® has a DNA tab associated with it. This tab is the central location for all DNA data linked to that animal. The DNA table includes samples, test requests and results. The DNA table location The DNA table is ...Data Types and Stockbook Fields
Data Types and Stockbook Fields When importing a CSV file to Stockbook the CSV file headings will need to be linked to Data Types and Stockbook Fields. The following is a list of Data Types and associated Stockbook fields available: Data Type: Life ...Import a CSV File
Importing a CSV File Importing CSV files allows the user to bring animals and associated data into Stockbook. Before you begin Always take a backup of your Stockbook data before importing CSV files. CSV files can corrupt so it is advisable to create ...TSU template in Live Entry
TSU template in Live Entry Setting up a Live Entry template to collect a TSU sample. To bring in TSU (Tissue Sampling Unit) data into Live Entry follow these steps: Step 1. In Stockbook, Live Entry, go to Setup> Data Entry Template Step 2. Go to ...