Herd Transfer
Section 1 - Transferring Animals Out of a Stockbook Database
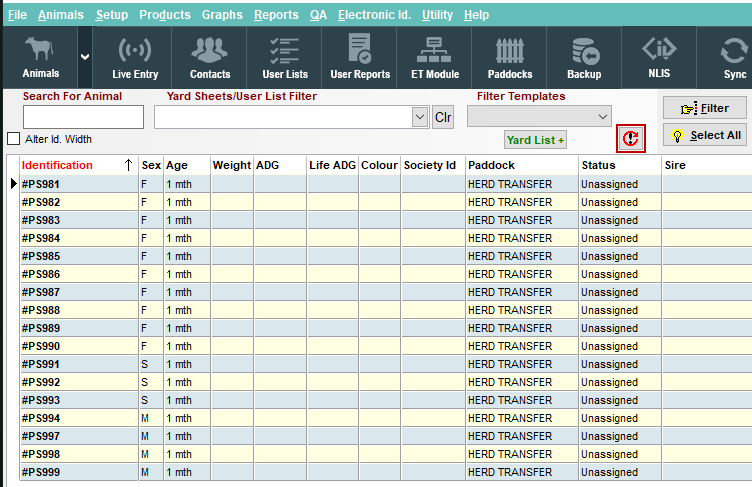
Step 1. Select Animals to be Transferred.

It is important that animals have not been disposed/sold at the point of the Herd Transfer, this needs to happen after the Herd Transfer file has been created.
Step 2. Backup for the Herd Transfer.
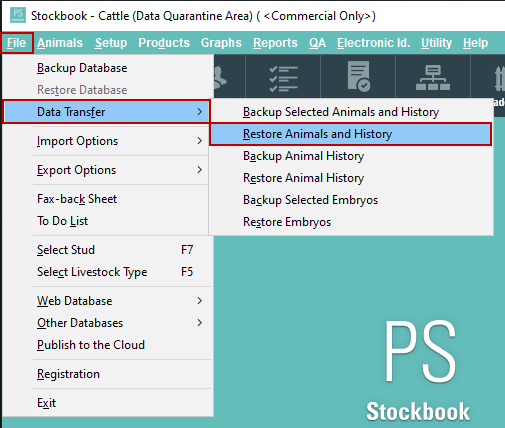
- Go to File,
- Data Transfer,
- Backup Selected Animals and History.
Step 3. Choose Data to be Transferred.
- Tick the boxes indicating the data that you require to be transferred.

It is not recommended to transfer Pedigree Animals. It will transfer excessive data.
Only transfer if required.
- Confirm the selection by clicking on OK.
Step 4. Complete the Herd Transfer Backup
- Take note of the location against 'Backup Name' - You can customise the HerdTran.zip name if you wish
 It will be needed to retrieve the backup to send to the recipient of the transferred animals C:\Users\User\Documents\Stockbook\HerdTran.zip.
 - Click OK to confirm.
- A 'Backup Complete' window will pop up.
- Click OK to close the window.
Step 5. Select Animals to be Disposed in your Stockbook
- Click on Events at the bottom of the screen
- Find Disposal,
- Select 2). Sale/Death/Disposal,
- Confirm the selection by clicking on OK.
Step 6. Confirm Disposal Event
- Select Reason (**See Info below).
- Select Type - Death/Disposal/Transfer.
- Check and click OK.
Press "+" if you haven't already got a reason in the dropdown list.
Step 7. Confirm Disposal Recording.
'Are you sure that you want to record disposal for selected animals?' > Select Yes
'Event complete' > Select Ok
You have now completed the first section of the process on how to transfer animals from one Stockbook Database to another. All animals will now be disposed in your Stockbook.
Section 2 - Herd Transfer Checkpoint - Recipient
If you are receiving more than one animal via Herd Transfer we strongly recommend that you use this method to limit the risk of data corruption.
This step assumes you are importing the Herd Transfer file for the first time. There is no need to create a new database every time a Herd Transfer is done.
If you already have a Data Quarantine Area setup within your Stockbook you can skip Step 1 and go to Step 2.
If you already have a Data Quarantine Area setup within your Stockbook you can skip Step 1 and go to Step 2.
Step 1. Generating a Data Quarantine Area:
- In Stockbook select File,
- Select Other Databases,
- Select Manage Databases.
- Select Create New.
- Make the Description something you will recognise (Example: Data Quarantine Area),
- Select OK.
- Select Close.
Now open the new database you created: - Select File,
- Select Other Databases,
- Select the new database (Example: Data Quarantine Area).
The name of the database should reflect the name of the new database.
Step 2. Restoring Animals and History into Data Quarantine Area:
- Download the Herd Transfer file from the source you received it.
- In Stockbook select File,
- Select Data Transfer,
- Click on Restore Animals and History.
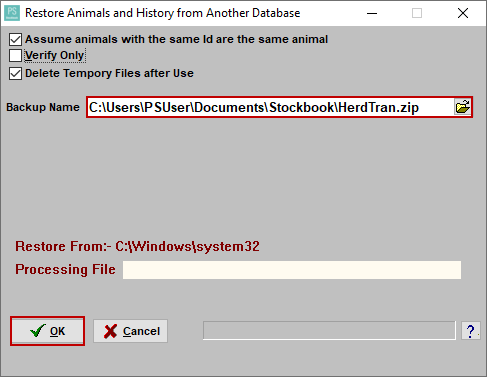
Step 3. Restore Backup from another Database:
- Check the correct Backup File has been selected.
- Click OK.
The reason we are doing this data isolation process is that Stockbook assumes that all the IDs are unique, and will attempt to merge the animals with the same ID.
- Confirm you are happy to proceed with restoring animal and history details from another database.
Step 4. Temporary Restore
Click OK on the pop-up information box asking you to continue with the restore.
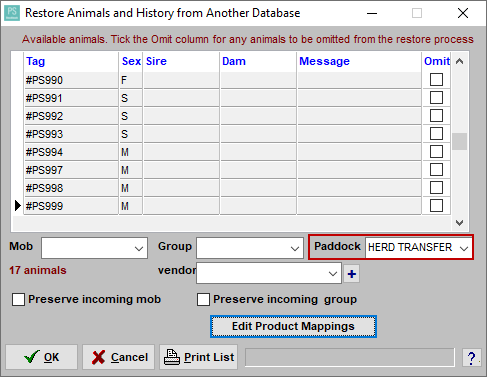
Step 5. Assign Available Animals
- You will need to allocate the relevant mob, group, paddock, and vendor if applicable.
- To maintain the mobs and groups the animals were allocated to in the previous database, simply tick 'Preserve incoming mob' and/or 'Preserve incoming group'.
- If you wish to omit any animals from being transferred from the file simply tick the 'Omit' box next to the relevant animal.
- Click on OK to confirm the selection.
Step 6. Confirm Restoration
- Click YES to any information alerts that pop up.
- Select OK to Restore Complete window.
Step 7. Refresh to View
If the animals are coming from a Stud system, the animals will appear in "All Societies".
If you need to access "All Societies", select File > Select Stud (F7) > Choose "All Societies".
- Click the Refresh button in Stockbook.Animals on the transfer file will be available for viewing on the Animals screen.
Step 8. Data Check
Now to the key steps:
1. Check the animal's Primary IDs, for potential ID duplicates with your database.
If you feel there is a high risk of the IDs matching, change the VID of the animal by adding a # to the start or end of the ID.
This will make the ID unique and it will not merge with any of your current animals.

Alternatively, you can do a bulk change of the animal's ID to include a prefix to make it unique.
2. Check the animal's EU Status.
If it is blank the animal never received an EU Status or it was not sent to you in the Herd Transfer.
3. Check the animal's Breed.
If the Breed is blank the animal didn't have a relevant breed or it was not sent via the Herd Transfer.
4. In the Edit Animal window, check the DNA field if it is blank the animal didn't have any data in the DNA field or it was not sent via the Herd Transfer.
Step 9. Transfer to your database.
Once you are comfortable with the data being as clean as possible and will have a low risk of merging, repeat Section 1 Transferring Animals Out of a Stockbook Database, emphasis on Step 6. Choose Data to be Transferred.
If there is any excess data you do not wish to import follow the directions in Step 6. Choose Data to be Transferred.
Section 3 - Transferring Animals Into a Stockbook Database
Step 0. Access your database
If you followed Section 2. Herd Transfer Checkpoint - Recipient database, please do this step.
- Select File,
- Select Other Databases,
- Select your database (Example: Cattle Test Database or Default Database)
Step 1. Take a Backup
- Here are the directions on How to Backup Stockbook.
Step 2. Restoring Animals and History into Data Quarantine Area:
- Download the Herd Transfer file from the source you received it from.
- In Stockbook select File,
- Select Data Transfer,
- Click on Restore Animals and History.
Step 3. Restore Backup from another Database:
- Check the correct Backup File has been selected.
- Click OK.
The reason we are doing this is that the system assumes that all the IDs are unique, and will merge the animals with the same ID.
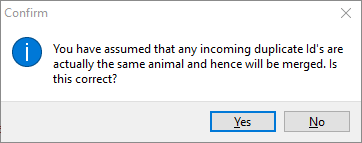
- Confirm you are happy to proceed with restoring animal and history details from another database.
Step 4. Temporary Restore- Click OK on the pop-up information box asking you to continue with the restore.
- Check the correct Backup File has been selected.
- Click OK.
The reason we are doing this is that the system assumes that all the IDs are unique, and will merge the animals with the same ID.
- Confirm you are happy to proceed with restoring animal and history details from another database.
Step 4. Temporary Restore
- Click OK on the pop-up information box asking you to continue with the restore.
Step 5. Assign Available Animals
- You will need to allocate the relevant mob, group, paddock, and vendor if applicable.
If you have a large database, we would suggest creating a paddock called Herd Transfer before importing the Herd Transfer file so it becomes easier to locate the new animals. - To maintain the mobs and groups the animals were allocated to in the previous database, simply tick 'Preserve incoming mob' and/or 'Preserve incoming group'.
- If you wish to omit any animals from being transferred from the file simply tick the 'Omit' box next to the relevant animal.
- Click on OK to confirm the selection.
Step 6. Confirm Restoration- Click YES to any information alerts that pop up
- Select OK to Restore Complete window
- You will need to allocate the relevant mob, group, paddock, and vendor if applicable.
If you have a large database, we would suggest creating a paddock called Herd Transfer before importing the Herd Transfer file so it becomes easier to locate the new animals. - To maintain the mobs and groups the animals were allocated to in the previous database, simply tick 'Preserve incoming mob' and/or 'Preserve incoming group'.
- If you wish to omit any animals from being transferred from the file simply tick the 'Omit' box next to the relevant animal.
- Click on OK to confirm the selection.
Step 6. Confirm Restoration
- Click YES to any information alerts that pop up
- Select OK to Restore Complete window
Step 7. Refresh to View
If the animals are coming from a Stud system, the animals will appear in "All Societies".
If you need to access "All Societies", select File > Select Stud (F7) > Choose "All Societies".
If you created a paddock called Herd Transfer before importing the Herd Transfer file, you can do a filter to group the animals together. Once you are confident that the data has come into your database correctly, you can now do an animal movement to put the animals where the are currently situated.
- Click the Refresh button in Stockbook.
- Animals on the transfer file will be available for viewing on the animals screen.
If you need to change the current stud the animals are located in follow this link to learn how to change the stud for animals.
- Click the Refresh button in Stockbook.
- Animals on the transfer file will be available for viewing on the animals screen.
If you need to change the current stud the animals are located in follow this link to learn how to change the stud for animals.Article ID 2126
Related Articles
Data Transfer
Herd Transfer Section 1 - Transferring Animals Out of a Stockbook Database Step 1. Select Animals to be Transferred Select the Animals you wish to transfer Click on Events at the bottom of the screen Find Disposal Select 2). Sale/Death/Disposal ...Transfer data from a reader
Transferring Data from a Reader involves transferring a log history (action list) from your Reader at the end of a session into Stockbook. This method provides a way of importing captured EID's only. 1. Connect Reader Switch on the Reader. Ensure ...Transferring dams and calves in same export
If someone is trying to export a group of animals to be transferred to another Stockbook, and is getting an error saying the dam eg.0123 is included in this transfer as well. **The dam number below is just an example** Because Stockbook is a ...Error - Missing Herd Letters
When entering new cattle, you might get the following error: This error will occur because you have stated that you are using Stockbook as a Breed Society in the Setup user options. If you are not using Stockbook to run a breed society, this needs to ..."You do not have a member with herd letters" error
Receiving the error message: 'You do not have a member with herd letters "ABC" Step 1. Go to Setup > User Options Step 2. Change: I am a Breed Society to I am a Normal User Article ID 302