Adjusting Email Settings
Updating passwords and other email details can be done by changing the following settings.

If there is a new email address being used, ensure you have updated this address in your Company record in Address Book.
Address Book > Search e.g. Your Company Name > System > Allow Changes to Company Record > Make changes > Save
1. Open the email settings on the server.
Choose Workstation from the System dropdown on the main screen:
2. Select the Server.
This is the main Workstation that holds the database. The Code/Name might have SVR or name of the pc, for example.
The machine you are on should already be highlighted. Ensure you are on the Server PC.
3. Select Email under "Devices".
To open the settings window.
4. Update the required settings.
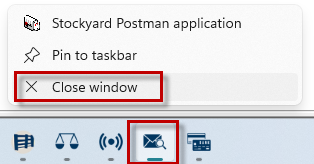
5. Close Postman.
Right click on the Postman ("Envelope") icon on the task bar and choose Close Window. This will refresh the settings.
6. Send a Test email.
Re-open Postman and send a Test email:
- Click on Queue Setup in Postman.
- Select Email Queue if there are multiple queues - Don't see an Email Queue? Click here to fix.
- Tick the box to Print a Test Page and click on Accept.
- Enter a different email address to the one used in the email settings just changed (personal one ideally).
- Click on Accept to send.
7. Check the Send Status
If you are quick you will see "sending" in the screen. It will disappear when successful.
8. Verify the email has been received.
If you have not received the email, check there are no errors showing in Status on the Postman Screen.
Troubleshooting

If there is an issue, the Status column will provide a description to help you or your IT to fix the problem.
Google "smtp settings for <your email host company>" to verify that you have the settings correct for your specific host.
Examples of issues you might encounter if the settings are not correct:
Related Articles
Setting up Email Queue
What is a Queue? A queue allows you to quickly manage Printers and Emails using the Print Queue options available in Livestock, Clearing Sales, Accounting, Address Book, and Postman. For instance, the Email Queue can be used by multiple email ...Weighing Using the Lot Interface
CALIBRATION OF SCALES Before a sale starts, ensure you have calibrated the scales so you can verify that the weights taken are accurate (from the Scale Indicator to the PC) : Roll on your approved weight (e.g. 50kgs of weights) Ensure all gates to ...Using Scheduled Reports
One of the quickest ways to send off reports once a sale is complete is to use the Scheduled Reports option for Vendors, Purchasers and Agents. With the click on just a couple of parameters all like reports will be sent to their various destinations ...Printing Labels in Stockyard
Setup a New Print Queue Open Main Menu and select Print Queue under the system Menu. If you have a label queue, select it or click add from the toolbar. Fill in the options as per below. Understanding the label print queue settings The following ...Attributes and their Uses
The Address Book is the hub for customising settings for the Livestock, Accounting and Clearing Sale modules in Stockyard. Attributes are created to help filter information, or assist in giving special treatment to an individual in a sale. These are ...