Using a Stockyard Remote System
It is possible to attend sales off-site/out of internet coverage using Stockyard to record the sale and print out reports. This requires a special setup and separate installation. Once the Remote System is installed on the laptop, printers and other devices are best cabled to a portable modem using ethernet cables for the fastest connection.
Part A: Pre-Remote Sale
i. Install Stockyard Remote, if not already installed - this needs to be booked in with Outcross Systems like any normal installation.
ii. Create the Sale in the Office as usual
Part B: Out of the Office
Load the Remote System with the Sale created in the Office System Database
Step 1. Login to the Remote System
After logging in, there will be a status window with 4 buttons:
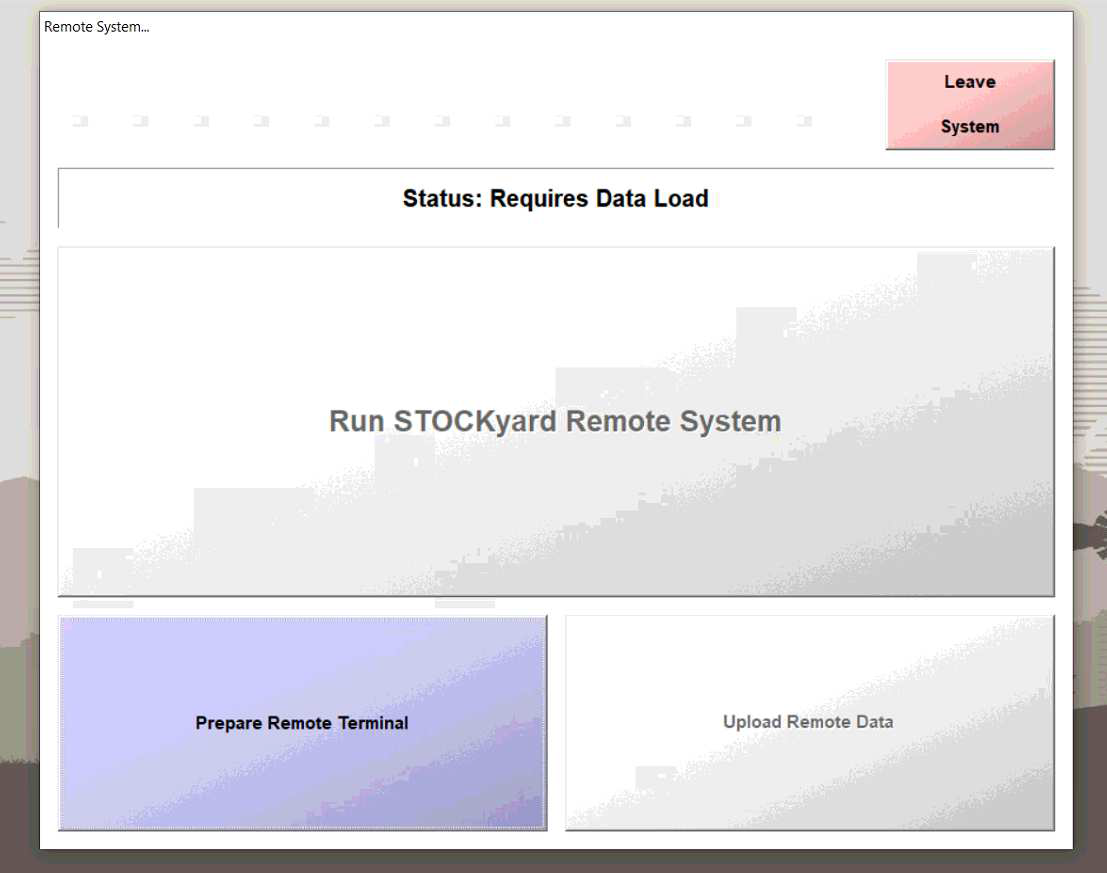
The status window displays information relative to the current process being performed throughout the loading and uploading phases.
Run STOCKyard Remote System - will be disabled until the Office system is loaded into the Remote system.
Prepare Remote Terminal - enables in the initial phase.
Upload Remote Data - disabled until the Remote system is loaded. It is enabled as soon as the initial phase is completed (the remote system has been prepared) and allows the Office system to be updated post sale.
Leave System - used to close off the current Remote processing session.
Step 2 - Prepare the Remote System
Click Yes
Step 3 - Check for Updates
The system first checks both the program levels and database structures of the Office system and the the Remote system.
If the Remote system is not as up to date as the Office system (which is often the case), the Remote system is updated and closes.
10 seconds later the remote system starts again and the loading process starts again.
The system (programs and/or data structures) have been updated.
Step 4 - Load the Remote Sale
Whilst still in the Office and with internet service, select the sale for Remote use.
The loading process displays open Clearing or Livestock Bidder sales (usually stud type sales).
After the system is loaded (prepared), this button is disabled until the Remote data collected and uploaded to the Office database.
The previous remote data is removed before loading the current Office database details.
After the old data has been removed the current Office database data is loaded.
Step 5 - Check the whole sale is loaded and ready for use.
The new data is now loaded onto the Remote System and is ready to be taken into the field. It can only be viewed and updated on the remote device.
After data is loaded the “Run STOCKyard Remote System” and “Upload Remote Data” are enabled
On the Office system, the selected sale is locked so that only the Remote system can process sales.
Step 6 - Run Stockyard Remote System
Click the “Run STOCKyard Remote System” and the standard main menu screen is displayed.
Process the sale as usual through the remote device.
Part C: Back in the Office
After the Remote sale details have been collected and the remote PC is back at the office and is connected to the Office network, the remote data can be uploaded to the Office system for processing.
Step 1 - Upload the data to the Office system
Click the Upload Remote Data button
After the remote data has been uploaded to the Office database, the Run STOCKyard Remote System button and Upload Remote Data are disabled.
The Prepare Remote Terminal button is now again enabled.
The Office system will now have the selected remote sales unlocked. This data is no longer available for updating on the remote device.
Step 2 - Process the sale in the Office system
The Office system may now update the remote sale data, but the remote system cannot be used as the Run STOCKyard Remote System button is disabled.
Tips and Tricks
1. Test the system a few days before leaving the Office to ensure it will work correctly. There are often Windows and/or Stockyard updates that have happened since the computer was last used.
2. Ensure all devices on your Wifi system are set to Private
3. Check printers etc print too.
Related Articles
How to use Stockyard Remote System
Remote System Operation Guide This guide provides step-by-step instructions for: Loading the remote system from the office system database. Using the remote system. Upon successful login, you will see a dialog box with a status window and four ...General Overview to Stockyard for a Saleyard
Getting Started with Stockyard Stockyard is a powerful saleyard management system that simplifies livestock sales, vendor and purchaser record-keeping, NLIS compliance, weighbridge and scanner integration, and reporting. 1. Launching Stockyard To ...Creating a Test System
Test Systems are used to create a safe environment (sandpit area) where you can try out a new idea or figure out what will happen if you do something in a certain way. When you create a Test System, it takes a snapshot of your current data Any ...Stockyard Hardware Specifications
This guide outlines the hardware and network requirements for running Stockyard and Stockyard Mobile effectively across various environments including servers, workstations, and mobile devices. Server Requirements For saleyards with multiple users ...Downloading and Configuring Stockyard Mobile Connectivity
Downloading & Updating Stockyard Mobile If you don't have Stockyard Mobile installed yet, follow these steps to get started: For Android Devices (Samsung, Google Pixel, etc.): Open the Play Store (sign into your Google account if prompted). Search ...