Add, Edit, and Delete Paddocks
This will display a list of paddocks already set up and will default to currently active paddocks.
Step 2. To include inactive paddocks, tick the Include Inactive box
Understanding the list:
The list presents basic details of every paddock in your database.
The following colour coding is important:
-
A dark green background means that you have selected the paddock
-
You may select paddocks in a contiguous group by clicking on the first paddock in the group, holding down the Shift key and then clicking on the last paddock in the group
-
Individual paddocks may be selected or deselected by holding down the Ctrl key and clicking on the paddock
-
If you only want to select one paddock, then just click on that paddock
-
Maroon italic text means the paddock is inactive
-
Red text means that the paddock is currently in quarantine, due to a previous chemical treatment
-
Editing the paddock (click on Edit
) will give you the withholding date
-
A paddock with a black triangle against it on the left-hand side  means that if you click on Edit, you will be able to view/edit details of that paddock
-
Simply click on any paddock to put it into that status. Double-clicking on a paddock will take you direct into edit/view mode
Add a new Paddock:
Edit a Paddock:
-
You can change the details on any paddock already entered in Stockbook by 'editing' the appropriate field from this screen
-
Modify details of paddock:
-
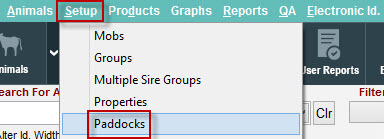
Click on the Paddocks toolbar button or the Setup > Paddocks menu option
-
Click on the paddock to be edited and Click on Edit, or double-click on the paddock to be edited
-
Modify details of paddock:
-
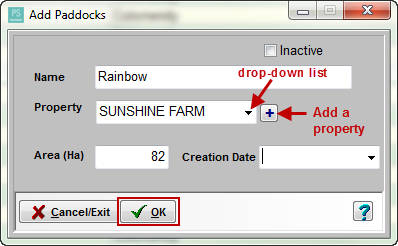
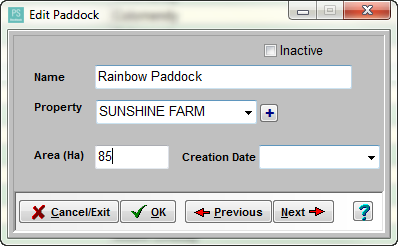
Name - this must be unique
-
Property - every paddock must be linked to a property. Select the property from the dropdown list. You can add a new property to the list via the + button
-
Area in hectares
-
Creation Date - this is optional unless you have Stockbook linked to Farmbook
-
Click OK to accept the data and close the form, or
-
Click on Previous to accept data and move to the previous paddock, or
-
Click on Next to accept data and move to the next paddock, or
-
Click on OK to accept data and move to next paddock, or click Cancel/Exit to abort data entry
Delete a Paddock:
-
Click on the Paddocks toolbar button or the Setup > Paddocks menu option
-
Click on the paddock to be deleted
-
Click on Delete button
-
Click Yes to Confirm message: 'Delete paddock Rainbow?'

Note: If the count of animals in each paddock disagrees with the actual counts observed in the main animal listing (via paddock selection in the filter window), you can click on the Reset button to force a recount.
Note: However, there may be another reason for a discrepancy, e.g. you have other selection criteria set in the filter screen.
Article ID 1537
Related Articles
Products - Setup, Purchase and Edit
Product Setup To enter the purchase of a product, firstly the product item will need to be setup. Select Products > Setup Select Add Select Type i.e. Vet. Product, feed Enter details for the Product Select 'Used in treatment' or select + to add a ...
Mobs, Groups, Livestock Class, Paddocks and Properties
Setup Mobs, Groups, Livestock Class, Paddocks and Properties. Add an item: Setup > select desired option (i.e. Mobs) > Add > enter Code & Description > OK Edit an item: Setup > select desired option (i.e. Mobs) > highlight the item > Edit > OK Delete ...
Contacts: History
Contacts: History Adding a note or event relating to a specific Stockbook contact. Editing a Contact: Select the Contact from the Contact List Click on Edit at the bottom of the screen The History information will be at the bottom of the contact ...
Delete an incorrect pedigree-only sire
A sire can be added via the Add/Edit Animal screen (of any animal), in the Birth Details section, by clicking on the + button beside the entry point for Sire. Any animal added this way is for pedigree purposes only , and will be Inactive . Such ...
How to add a feedlot
Adding a feedlot and assigning animals to the feedlot: Step 1. Add a Contact When setting up Stockbook for a feedlot situation, a contact must be added Click on the Contacts toolbar option Step 2. Add a Feedlot Click on the Add button at the bottom ...